A few weeks ago I talked about the power of experiences and how “doing stuff” creates more happiness in your life than any material item you could purchase.
I got a few emails from the peeps out there asking for some recommendations on cool experiences or challenges to try.
While there is an unlimited amount of super cool things you could do:
But most importantly it’s a challenge and that single ingredient is what creates a sense of pride, confidence, and self worth.
It goes back to the “Ikea Theory” I've discussed before. Sure you can buy a bar stool and place it in your kitchen but when you are the one that has to put it together a sense of pride and value comes over you and that silly stool, it holds more value. Putting that stool was a challenge you had to overcome.
Enough of my rambling and if you haven't left yet to read another blog I’d like to present to you….
Drum roll please…..
The beginners guide to slacklining
If you’ve purchased a kit, the directions are fairly easy to follow but they leave out some important pieces of information.
The loops that you create around your anchor (ie: slackline around tree) should be about upper thigh to hip height. As the line is stretched out between trees it will also be roughly upper thigh to hip height.
Having the line set up at this height will allow for about 6-12” of sag in the line as you're attempting to balance on it.
Tighten your line using the ratcheting system that comes with your kit tight enough so that the loops around your anchors (trees) does not move. As you become a more experienced slackliner, you can play with different tensions in your line to create different levels of difficulty. Generally the looser it is and the more bounce the line has in it, the more difficult it will be to walk; yet this also makes it a great line to perform tricks on.
With your clothes.
Ok, I’m sort of serious and sort of just being sarcastic. While the brand of your pants might not be important, it is important to make sure they’re not too loose fitting or hanging over your feet. Roll those dang things up if you have to, just make sure they are out of the way so you’re not tripping all over them.
Something you don’t mind getting a little dirty and comfortable should do the trick. A personal favorite is board shorts… but southern California allows for that year round.
As for shoes, the only time you’ll need them is for the drive to the park and maybe the walk across the field to find your trees, and maybe not if you’re a rebel.
Walking the line without shoes will allow you to get a better feel for the line. That sense of touch is what gives your body a sense of awareness in space and will benefit your sense of balance greatly.
If you must wear shoes, try skate shoes, vibrams, or chucks classics as they are extremely flat.
Before mounting the line, make sure to relax and breathe.
If you kick a soccer ball with your right foot, stand parallel to the line with your left thigh touching it. If you kick a soccer ball with your left foot, stand next to the line with your right thigh touching it.
You’ll want to mount the line closer to the anchors of the tree. This is usually the best place for beginners because the tension creates a faster but smaller shake in the line. As you try to mount closer to the middle the lines will have much larger, low sagging, but slow movements. You may want to play with the best place to mount for you but once you’ve found a good spot, make sure to mount from the same spot every time to create a memory for your nervous system.
Pick up the foot that is closest to the line and place it on the slackline with it running through your big toe and second toe and running right to your heel. You’ll probably notice some pretty gnarly shaking (I like to call this the jimmy leg). Don’t worry, this is totally normal.
To help control this shaking you can do two things:
If you’re looking at your feet or at the line, you’ll be staring at a moving object and this can screw up your sense of balance.
After establishing a stable focal point ahead of you, make sure to center your weight on the foot on the line and swiftly stand up on that leg.
Don’t hesitate for a second and fully commit. If you hesitate or don’t believe in yourself for even just a second and half ass the mount it’s not going to happen for you.
Use your arms for balance by holding them out to your sides at shoulder height.
Once you’ve found your balance on the line, try and hold it there for a few seconds before attempting to walk. Make sure your legs are slightly bent. This will lower your center of gravity and help to absorb movement from the line.
If you are really struggling with popping up it’s usually because of lack of strength or balance.There are a few things you can do to help turn these weaknesses into strengths:
1. Start strength training: One legged movements like lunges, step-ups, and pistols/1-legged sqauts will help strengthen the muscles that are being used to press you up onto the line. Squats and deadlifts will also help.
2. Work on balance: You can actually have someone sit on the line to help stabilize it as you mount. The closer they are to you, the more stability the line will have. As you get comfortable, your partner can move farther away until they are completely off the line.
You can also practice balance by walking heel to toe on a line of tape on the ground. As this becomes easy, try to walk the tape on your toes and not to allow your heels to touch the ground. Once you get comfortable there, you can use a 4-inch wide piece of wood that is a few inches off the ground. Then use a thinner piece of wood as you get more comfortable.
Once you’ve made contact, you’ll want to place the line in between the big toe and second toe and have it run right to the back of the heel just like when you mount the line.
Continue walking the line in this fashion and remember to maintain focus on something stable in front of you, hold those arms out to your sides at shoulder height, and continue to breathe.
Because the line has tension and will sag as you are on it; this means you could get thrown a bit. You’ll want to use that to your advantage by letting it push you away from it, thus, avoiding it hitting you.
And guys, believe me, you do not want to come straight down on that line… no what I’m saying?
Because you’ll be barefoot, make sure the area around you is free of any debris, sharp objects, or rocks.
It should be fairly easy to land on your feet most of the time but if you do happen to lose balance and feel like you may be hurdling towards the ground, I suggest turning your body to your dominant shoulder and front rolling.
The more often you practice the better, but you don’t have to spend hours on end in order to get better. A good 20-minute session should do the trick but even if you can only get in 5-10 minutes per day, the consistency will really pay off as you’re trying to retrain your nervous system.
The most important thing is consistency. Shorter but more frequent sessions will allow you to improve much quicker than one single long session each week. So if you’re really dead set on getting better, schedule some time in as often as you can. If possible, leave that slackline mounted in your backyard and hop out there at random points during the day.
One important thing to remember is that it does take sometime for your nervous system and muscular system to warm up, so don't be surprised if you struggle a bit during the first few minutes of a session. You can help speed up the process by performing a brief warm up routine consisting of air squats, lunges, one legged squats/pistols, hollow rocks, and tippy toe walks on the ground.
Receptors that are extremely sensitive to movement like stretching and pressure in your muscles, tendons, and joints help your brain figure out where your feet and legs are positioned relative to the ground and also how your head is positioned relative to your shoulders and chest.
There are then balancing organs located in the inner ear that let your brain know the movements of your head.
Finally all this information is sent to the brain stem along with information regarding previous experiences that have affected your balance (this is why practice is so important) stored in your cerebral cortex and cerebellum. Once this information is digested, messages are sent to the eyes and other parts of the body that will help you stay balanced and maintain clear vision while you are in motion. adapted from Shannon Hoffman
Now what are you waiting for?
Go and treat yourself to a new experience. One that will promote a healthy lifestyle, improve balance, focus, coordination, and most of all be one heck of a time.
I got a few emails from the peeps out there asking for some recommendations on cool experiences or challenges to try.
While there is an unlimited amount of super cool things you could do:
- Wine tasting
- Cliff jumping
- Hiking
- Cooking classes
- Pottery course
- Dance lessons
- Trying a new cuisine
- 30 days of honesty
- Meditation challenge
But most importantly it’s a challenge and that single ingredient is what creates a sense of pride, confidence, and self worth.
It goes back to the “Ikea Theory” I've discussed before. Sure you can buy a bar stool and place it in your kitchen but when you are the one that has to put it together a sense of pride and value comes over you and that silly stool, it holds more value. Putting that stool was a challenge you had to overcome.
Enough of my rambling and if you haven't left yet to read another blog I’d like to present to you….
Drum roll please…..
The beginners guide to slacklining
What is slacklining?
Essentially slacklining is like tight rope walking but on a tether/line (rope, or chord) that has a little less tension and give to it.How to choose a slackline
For beginners and those just starting to dabble in slacklining, I suggest picking up one of the many kits that are available. A good kit will run you anywhere from $50-$140 bucks and I highly recommend investing in a cheap one at first to see if you really enjoy the experience.- Gibbon
- Slackstar
- Singing rock
How to set up your slackline
When I first purchased my slackline setting it up was actually one of the most difficult parts. Maybe it was the excitement rushing over me, sheer impatience of wanting to just start walking on it, or just being a knucklehead but the majority of my first slacklining session was spent trying to figure out where and how to set the dang thing up.Step 1: Choosing a location
All you’re really going to need is a fairly open space with structures that will allow you to wrap your line around. Trees, columns, poles, and really any two tall and sturdy structures will work, but I suggest finding two sturdy trees at a local park or in your backyard. The bark provides a little friction to hold your line stable and plus parks just rock.Step 2: Setting up your line
For beginners, you’ll want about 15-25 feet of space in between your two trees. The shorter the distance, the more stability you’ll have in your line, making it easier to find your balance. This might leave quite a bit of extra line but don’t worry, it won’t be in the way and it’s not necessary to use the entire line.If you’ve purchased a kit, the directions are fairly easy to follow but they leave out some important pieces of information.
The loops that you create around your anchor (ie: slackline around tree) should be about upper thigh to hip height. As the line is stretched out between trees it will also be roughly upper thigh to hip height.
Having the line set up at this height will allow for about 6-12” of sag in the line as you're attempting to balance on it.
Tighten your line using the ratcheting system that comes with your kit tight enough so that the loops around your anchors (trees) does not move. As you become a more experienced slackliner, you can play with different tensions in your line to create different levels of difficulty. Generally the looser it is and the more bounce the line has in it, the more difficult it will be to walk; yet this also makes it a great line to perform tricks on.
Step 3: Mounting the line
One of the most important things you can do for yourself is to learn how to mount the line with some style, and where does style start?With your clothes.
Ok, I’m sort of serious and sort of just being sarcastic. While the brand of your pants might not be important, it is important to make sure they’re not too loose fitting or hanging over your feet. Roll those dang things up if you have to, just make sure they are out of the way so you’re not tripping all over them.
Something you don’t mind getting a little dirty and comfortable should do the trick. A personal favorite is board shorts… but southern California allows for that year round.
As for shoes, the only time you’ll need them is for the drive to the park and maybe the walk across the field to find your trees, and maybe not if you’re a rebel.
Walking the line without shoes will allow you to get a better feel for the line. That sense of touch is what gives your body a sense of awareness in space and will benefit your sense of balance greatly.
If you must wear shoes, try skate shoes, vibrams, or chucks classics as they are extremely flat.
Before mounting the line, make sure to relax and breathe.
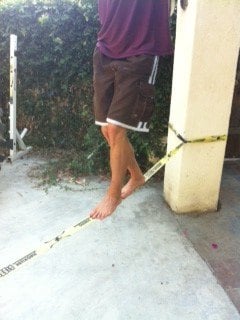
If you kick a soccer ball with your right foot, stand parallel to the line with your left thigh touching it. If you kick a soccer ball with your left foot, stand next to the line with your right thigh touching it.
You’ll want to mount the line closer to the anchors of the tree. This is usually the best place for beginners because the tension creates a faster but smaller shake in the line. As you try to mount closer to the middle the lines will have much larger, low sagging, but slow movements. You may want to play with the best place to mount for you but once you’ve found a good spot, make sure to mount from the same spot every time to create a memory for your nervous system.
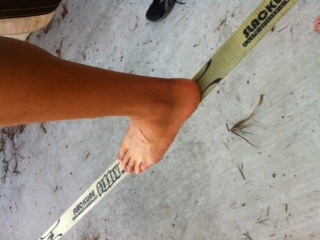
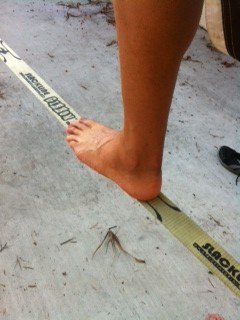
Pick up the foot that is closest to the line and place it on the slackline with it running through your big toe and second toe and running right to your heel. You’ll probably notice some pretty gnarly shaking (I like to call this the jimmy leg). Don’t worry, this is totally normal.
To help control this shaking you can do two things:
- Lighten the load or pressure that your putting on the line. Don’t put so much weight on the line initially, you may want to just barely touch it.
- Put your outer thigh on the line to help stabilize it.
If you’re looking at your feet or at the line, you’ll be staring at a moving object and this can screw up your sense of balance.
After establishing a stable focal point ahead of you, make sure to center your weight on the foot on the line and swiftly stand up on that leg.
Don’t hesitate for a second and fully commit. If you hesitate or don’t believe in yourself for even just a second and half ass the mount it’s not going to happen for you.
Use your arms for balance by holding them out to your sides at shoulder height.
Once you’ve found your balance on the line, try and hold it there for a few seconds before attempting to walk. Make sure your legs are slightly bent. This will lower your center of gravity and help to absorb movement from the line.
If you are really struggling with popping up it’s usually because of lack of strength or balance.There are a few things you can do to help turn these weaknesses into strengths:
1. Start strength training: One legged movements like lunges, step-ups, and pistols/1-legged sqauts will help strengthen the muscles that are being used to press you up onto the line. Squats and deadlifts will also help.
2. Work on balance: You can actually have someone sit on the line to help stabilize it as you mount. The closer they are to you, the more stability the line will have. As you get comfortable, your partner can move farther away until they are completely off the line.
You can also practice balance by walking heel to toe on a line of tape on the ground. As this becomes easy, try to walk the tape on your toes and not to allow your heels to touch the ground. Once you get comfortable there, you can use a 4-inch wide piece of wood that is a few inches off the ground. Then use a thinner piece of wood as you get more comfortable.
Step 4: Johnny Cashing aka Walking the line
Once you’ve found your balance and are comfortable on the line, you’ll want to start walking it.. For myself, I’ve found that moving the foot that is behind the lead foot and searching for the line with the big toe is most effective. I also prefer not to go heel to toe but instead have a little space between them.
Once you’ve made contact, you’ll want to place the line in between the big toe and second toe and have it run right to the back of the heel just like when you mount the line.
Continue walking the line in this fashion and remember to maintain focus on something stable in front of you, hold those arms out to your sides at shoulder height, and continue to breathe.
Progression tips
As you keep improving you may want to start to challenge yourself a bit more. Here are a few good beginner to intermediate progressions you can try once you’ve mastered mounting and Johnny Cashing the line.- Mount with non dominant/other foot
- Mount with both feet by hopping up
- Mount facing the line instead of parallel to it
- Backwards walking
- Sideways walking
- Turns on the line (180 and 360 degrees)
How to fall correctly
Here is the honest Abe in me coming out, you WILL fall off the line. Now I just want to make sure you do it correctly and avoid any injury.Because the line has tension and will sag as you are on it; this means you could get thrown a bit. You’ll want to use that to your advantage by letting it push you away from it, thus, avoiding it hitting you.
And guys, believe me, you do not want to come straight down on that line… no what I’m saying?
Because you’ll be barefoot, make sure the area around you is free of any debris, sharp objects, or rocks.
It should be fairly easy to land on your feet most of the time but if you do happen to lose balance and feel like you may be hurdling towards the ground, I suggest turning your body to your dominant shoulder and front rolling.
How should you practice
Practice…. We’re talking about practice?The more often you practice the better, but you don’t have to spend hours on end in order to get better. A good 20-minute session should do the trick but even if you can only get in 5-10 minutes per day, the consistency will really pay off as you’re trying to retrain your nervous system.
The most important thing is consistency. Shorter but more frequent sessions will allow you to improve much quicker than one single long session each week. So if you’re really dead set on getting better, schedule some time in as often as you can. If possible, leave that slackline mounted in your backyard and hop out there at random points during the day.
One important thing to remember is that it does take sometime for your nervous system and muscular system to warm up, so don't be surprised if you struggle a bit during the first few minutes of a session. You can help speed up the process by performing a brief warm up routine consisting of air squats, lunges, one legged squats/pistols, hollow rocks, and tippy toe walks on the ground.
A little science about how balance works in the body
Balance in the body stems from multiple systems working as a team to help create stability between your body, brain, and vision.What is good balance:
- Correct sensory information from your eyes, muscles, tendons, ligaments, joints, and organs of the ear.
- Your brain stem translating all this information that is trying to be processed at once and making sense of it as it delivers the message to the ol'noodle upstairs.
- The movement of your eyes being able to keep things in your line of vision stable.
Receptors that are extremely sensitive to movement like stretching and pressure in your muscles, tendons, and joints help your brain figure out where your feet and legs are positioned relative to the ground and also how your head is positioned relative to your shoulders and chest.
There are then balancing organs located in the inner ear that let your brain know the movements of your head.
Finally all this information is sent to the brain stem along with information regarding previous experiences that have affected your balance (this is why practice is so important) stored in your cerebral cortex and cerebellum. Once this information is digested, messages are sent to the eyes and other parts of the body that will help you stay balanced and maintain clear vision while you are in motion. adapted from Shannon Hoffman
Now what are you waiting for?
Go and treat yourself to a new experience. One that will promote a healthy lifestyle, improve balance, focus, coordination, and most of all be one heck of a time.